A tour of the window
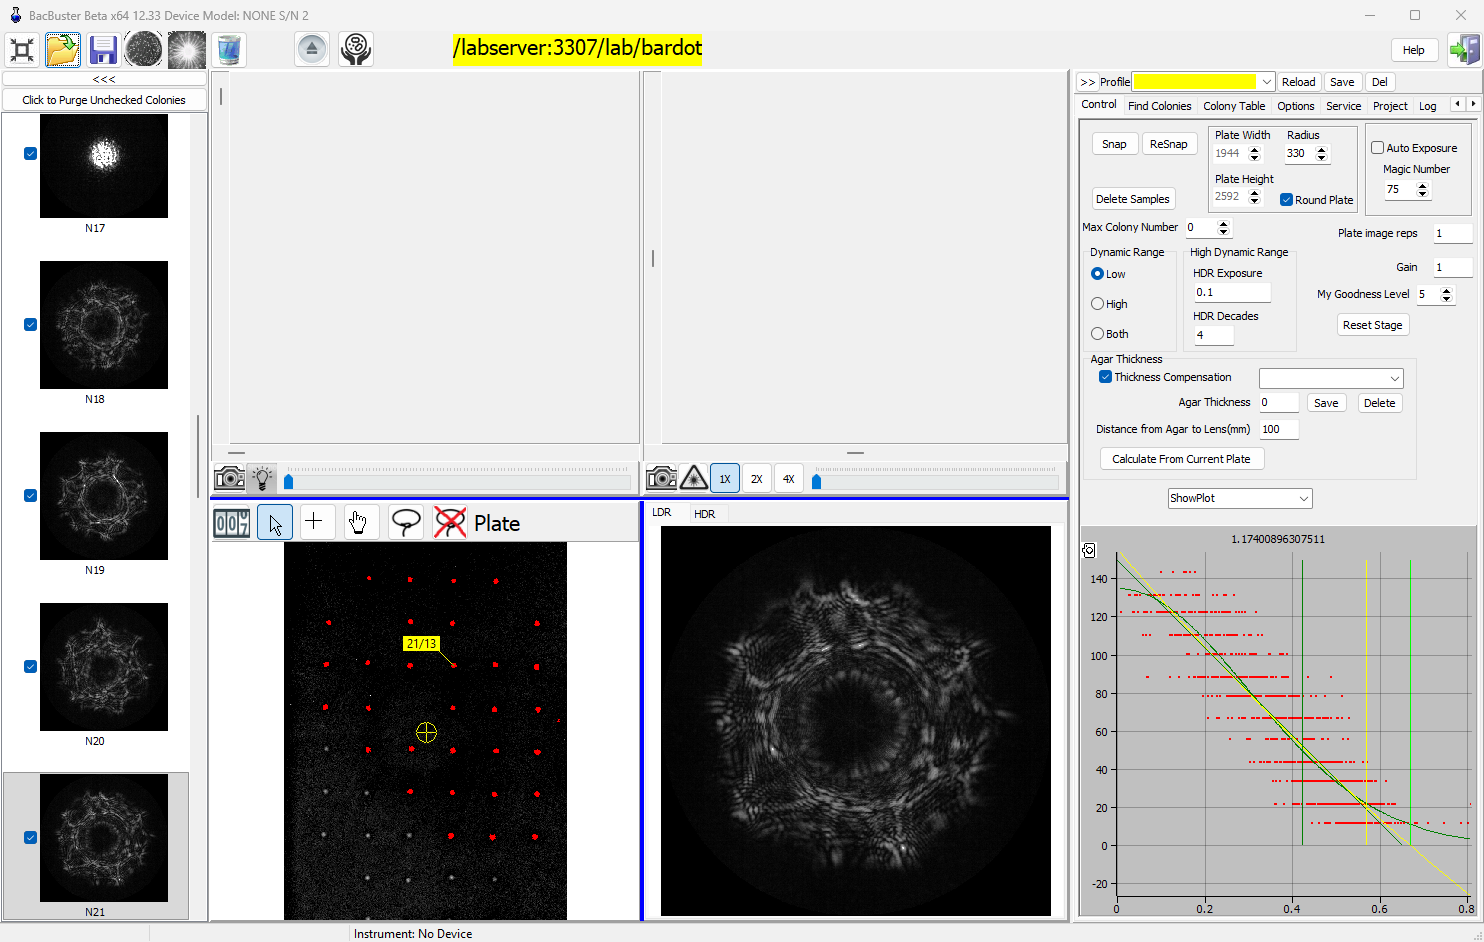
The window has five parts: the toolbar along the top, the scatter-image thumbnails on the left, the two live camera views above the plate image and the scatter image in the middle, and the settings tabs on the right. The status bar at the bottom shows progress, the last message and the instrument's name.
The toolbar

From left to right: Full Screen, Open plate, Save plate, Plate Image, Scan Colonies, Clear, Load / Eject, and - when a Cytomat is attached - Cytomat. Then the database label, Help and Exit. A red warning button appears after the clear button when something needs your attention, and on Hettich instruments with a deck sensor a square shows whether the loading deck is occupied (red) or free (green). The Toolbar page describes every button.
The database label names the database plates are saved to and opened from, for example
/labserver/lab/bardot. Click it to choose another - see
Connecting to a database.
The thumbnails
Every scanned colony appears on the left as a thumbnail of its scatter image, numbered in scan order (N1, N2, ...). The tick box beside each says whether the colony is kept: unticked colonies are removed by Click to Purge Unchecked Colonies and are not saved. Click a thumbnail to see its scatter image large and its colony marked on the plate image. <<< narrows the column, >> widens it again. See Reviewing scatter images.
The live views
The upper half shows what the two cameras see, live:
| Plate camera (left) | Scatter camera (right) | |
|---|---|---|
| Camera button | Live plate image on / off | Live scatter image on / off |
| Light button | Plate light on / off | Laser on / off |
| Slider | Plate camera exposure | Scatter camera exposure |
| Other | 1X, 2X, 4X zoom |
Double-click a live view to return its exposure to the default. The scroll bars around the live plate view move the stage to a position; those around the live scatter view move it a little at a time, to nudge a colony into the beam. See Exposure and dynamic range.
The plate image and the scatter image
The lower half shows the plate image - the photograph of the dish, with the colonies found on
it coloured: red colonies will be scanned, green ones will not. The yellow cross is where
the laser beam is, and a yellow label marks the selected colony: 3/17 is scatter image 3 of
colony 17, */17 a colony not scanned yet. Above the image are the plate tools and the plate
name:

| Tool | What a click on the plate image does |
|---|---|
| Colony Count (the counter) | Opens the colony counter |
| Arrow | Selects the nearest colony |
| Cross | Moves the stage so that the laser falls on that point |
| Hand | Selects the nearest colony and switches it between scanned and not scanned |
| Lasso | Draw around colonies: only colonies inside lassos are scanned |
| Crossed-out lasso | Removes the lassos: every colony found is scanned again |
See Choosing colonies.
Next to it is the scatter image of the selected colony, on two tabs: LDR for the normal (low dynamic range) image and HDR for the high dynamic range one, when it was taken.
The tabs on the right
| Tab | What is on it |
|---|---|
| Control | Snap and ReSnap, plate size, exposure, dynamic range, agar thickness, colony limit, and the colony profile chart |
| Find Colonies | How colonies are found on the plate image, and the list of colonies found |
| Colony Table | The positions and sizes of the scanned colonies |
| Options | Database options, image options, laser centring and e-mail alerts |
| Service | Calibration, camera, test runs and the instrument's settings |
| Project | Plates planned in ExpManager |
| Log | Messages, with times |
| Jukebox | The stage motors play a tune |
Above the tabs, Profile stores and recalls groups of settings - see Profiles - and >> hides the tabs to give the images more room. All tabs are described on The tabs on the right.
Full screen
The leftmost toolbar button fills the screen with the window, without title bar; click it again to return.